It is pretty well known at this point that Mr. Money Mustache is enamored with solar power. Besides the obvious Sci-Fi coolness of it (Electricity, Satellites, Futuristic Robots!) and the eco-friendliness of it (energy with zero noise or pollution), in the last five years the money side of things has finally matured, so that solar power is now the cheapest way to make electricity – even before you account for the added bonus of any available subsidies and the benefits of pollution-free living.

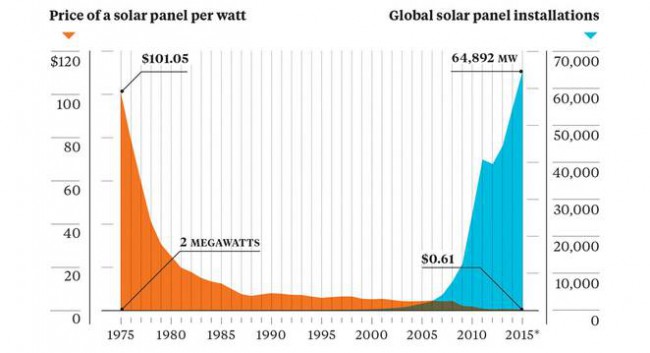
A Watt of Solar Panels: From $100+ to under fifty cents (2017) in less than my lifetime (image source cleantechnica). And the 2017 number for the blue side of the graph hit over 95,000 MW.
It works for individuals: In many cases, if you can get a good rack of solar panels on your roof, your monthly savings will be equivalent to making an investment that performs better than the stock market. But the numbers look even better as your solar setup becomes larger, like if you’re running a solar energy utility or a community solar farm.
Related: In recent Colorado Energy Bids, Solar energy is the cheapest option, even when backed by battery storage (Vox).
The fun part of this for me has always been the physics. Ever since I learned how much energy the Sun shines onto our planet’s surface (about 16,000 times more energy than all of humanity consumes, even with our current bloated habits), I have been certain that a mostly-solar-electric world was inevitable. The only obstructions were human inertia and politics, which are temporary. Physics is forever.
For example, consider the following map showing the tiny amount of our deserts we would need to cover with solar panels to replace all energy consumption (electricity, oil, gas, nuclear, hydro, wind, etc)

Fig. 1: Tiny land area required to power all of humanity. (image source)
And it’s actually even better than that: the image above assumes an old-school solar panel efficiency of 8%, whereas 18% is now a standard rate. So you can cut the black dots in half again, and then chop a few more times to account for the other existing clean energy sources.
And of course, you don’t have to concentrate the panels and run giant power lines everywhere as implied by the map. You can stick solar panels virtually anywhere and they will start working like little employees for you, tirelessly cranking out energy (which is equivalent to money) and automatically.
Which is of course the real subject of this article.
My DIY Solar Project

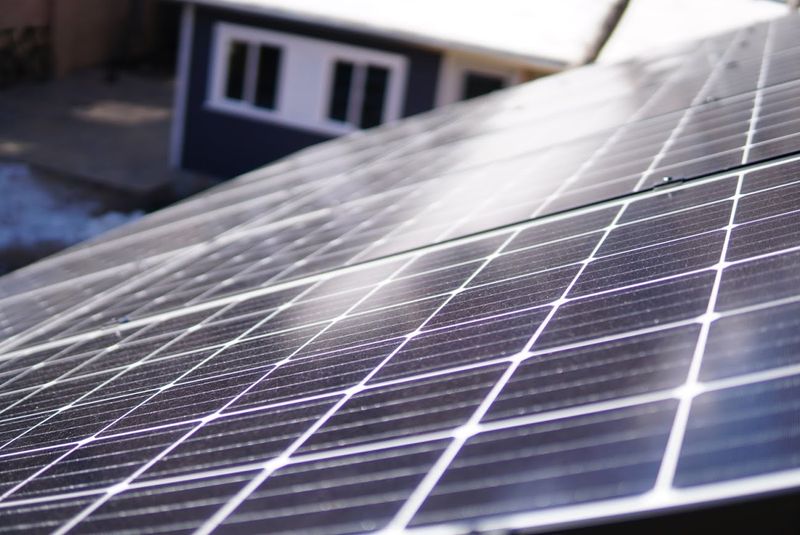
The new solar array at the MMM HQ workshop generates more than enough power to run the whole property year-round, plus charge the electric cars of the various members.
So naturally, I have always wanted to have my own solar power farm. Until now, various excuses kept me from getting it done: no great places to put panels on the roof of my main house, slightly unfavorable local regulations, but mainly a lack of knowledge of exactly what to buy and how to install it.
I vowed that whenever I finally got this project done, I’d write up a report to you, to spare you some of the research and time consumption that I had to go through.
So let’s get into it!
Part One: Show me the Money
As you can see from the picture above, I’ve started by building a relatively small solar array. There are twelve panels, each about 40 x 60 inches. Each one generates 300 watts of electricity when the sun shines, and when you run the numbers for my climate, the whole setup will crank out about 6100 kWh/year of electricity, a chunk which is worth about $732 per year at average US power prices.
Pretty amazing – enough energy to run my coworking space and Mrs. MM’s adjacent retail store… from a chunk of pretty black glass that is about the same size as a single car parking space!
Meanwhile, the wholesale cost of this equipment broke down roughly like this:
- 12 solar panels at $130 each: $1656 (a total of 3600 watts at 46 cents per watt)
- 12 Optimizer modules (which increase power output during partial shade): $650
- One SolarEdge 6 kW Inverter (converts the DC current from the panels to AC for the grid): $1102
- Various brackets, mounting racks, bolts, and wiring stuff: $460
So my total cost, due to the very good luck of having a friend who is both a dedicated Mustachian and the owner of a booming solar company, was $3900.
That’s the best case, but even after you add normal profit margins plus a 30% tariff that The Donald recently levied on solar panels (and remember the panels are thankfully only half the cost of the system), you can still buy a similar Complete kit for $6000 including shipping.
When you’re measuring the annual return on your investment (or “payback period”), there’s only one thing that matters on the cost side: price per watt. I ended up building this system at about $1.08 per watt, which is low by today’s standards but will soon sound high.
And remember, there are usually tax incentives to cut this cost further – you can take 30% off the top of this cost due to the US Federal “Investment Tax Credit (ITC)“, and possibly more from your state and local government or utility.
The Great Solar Journey to Durango
Last year, I met a badass Mustachian entrepreneur named John. He was in Longmont to visit some family here, but his real home base is in Durango, Colorado where he runs a successful solar installation company called Shaw Solar. There are a million stories that need to be told about this man, but for now we’ll start with this one.
Knowing how long I had been interested in a do-it-yourself solar project, John decided to step up and help me get it done at last. We went over technical details, calculations, strategies, and costs. All of this culminated in me taking a spectacular roadtrip to Durango along with another local friend, in May of 2017.
It was quite a trip, for much more than the acquisition of solar panels and advice. Durango is a stunning little town, and it turned out that John lives in a community of equally impressive siblings and friends – for example his brother Charles who DIY-renovated a 50,000 square foot school over a 20-year period, which has now become the jewel of Durango’s downtown.
Time For the Build
I drove back from this trip full of confidence and energy… only to end up storing the solar panels for months in my studio building as I worked to finish higher-priority parts of the Headquarters building, then waited for the time and motivation to plow through the building permit application.
It took another visit from John to really kickstart the project, and once we worked through it I realized my worry was completely unfounded – if you know what you’re doing, a simple solar array can be completely installed by two people in a less than a day’s work. Here’s what we ended up doing.
Step Zero: Research and Permit

Begin with the end in mind. The amazing Kari Spotts (LPC’s lead of renewable power metering) helps me swap in a new dual-flow electric meter at the successful completion of this project.
This is the part that stops most people before they even begin. The quickest shortcut is that if you’re not interested in these details, find someone who is, to catapult you through it. But if you have enough curiosity to learn the details, here they are:
How big a system should I build? In general, the bigger, the better. The cost per watt goes down as your system grows, making it a higher annual yield on the investment.
“I don’t live in Colorado. How much juice will I get out of it where I live?” This part is fun: The National Renewable Energy Lab runs a great, free calculator called PVWatts that does it all for you: factoring in average weather and solar angles in your area, even allowing you to specify solar panels placed at any crazy angle you like. (In other words, your house doesn’t have to have a perfect South-facing roof).
“Do I need some of those Tesla Powerwall Batteries too?” No. Unless you’re building an off-the-grid cabin, in almost all cases you will want to “grid-tie” your solar array, so you can effectively sell your surplus electricity back to the power company (and thus, other nearby customers), cleaning up your whole town and saving the huge cost of batteries. The Powerwall works great if you want protection from power outages, however, and can even pay for itself if you live somewhere with a smart grid that allows day/night price arbitrage.
“How do I get a permit to build this thing?” Your city’s building department probably has a page describing how to apply. For example, here’s the one for Longmont. The trickiest part is generating a “one-line diagram”, but I cheated by just photoshopping my own details into the example provided with my city, leading to this result, which they approved without question.
Step One: Layout
I had a nice, simple roof that was already facing South, tilted up at a 30 degree angle, which is just about perfect for solar panels. But you can also put them on other slopes or flat roofs, and they still work surprisingly well.
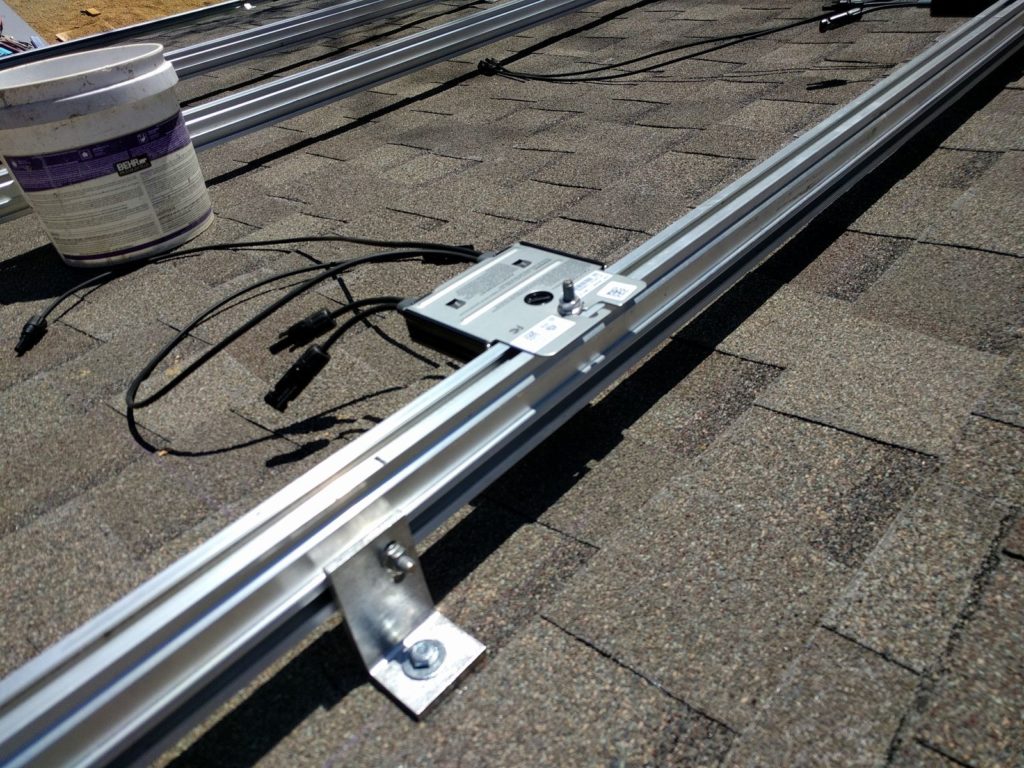
I needed two rails for each row of panels, and the rails get supported by “L”-shaped brackets bolted into the roof. So I ended up with this configuration:
Important consideration: Because I was putting this on a garage roof (technically “unoccupied space”), I was able to squeeze them all the way to the roof edge. If you are installing on a house, your city’s fire code may require that you leave a 3 foot walking access around the edges. Sometimes it’s wise to think outside the box: a garage roof, a standalone ground-mounted rack if you have lots of unused land, or creating the new workshop/carport/garden shed you’ve always wanted in the sunniest part of your yard.
2: Install your Brackets and Rails
Once you figure out where to put the long “lines” shown above, you measure them out and snap chalk lines right over top of your existing roof material. Then, use some sturdy 2.5″ lag bolts and washers to hold down the L-shaped brackets that come with the solar racking kit. Pre-drill each hole, and inject in some “Through the Roof” sealant with a normal caulk gun before driving in those bolts – this creates a permanent watertight seal. (There are also special brackets to accommodate different roof styles like tile and metal).
Once the brackets are in, you simply use the supplied slide-in bolts and nuts to attach the long rails, straighten them up nicely, and lock it down. Doing all of this with a cordless impact driver makes it quick and clean.
3: Bolt down and connect the Optimizers if you’ve Got ‘Em
These are just little flat boxes that you connect to the top of each pair of rails, about 6″ from the eventual right edge of each solar panel. There’s one optimizer for each panel, and it acts like a babysitter – monitoring output from the panel, compensating for voltage changes when necessary (such as when shade hits that panel). You’ll notice that each optimizer has four wires protruding from it, and there’s one optimizer for each panel. This will make sense in the next step.

Optimizer mounting (face down), plus a good shot of the connections between roof, brackets, and rails.
Once all the optimizers are in place, you connect each pair of longer wires together with the incredibly convenient fast-click connectors. The positive and negative wires have differently shaped connectors so you can’t accidentally reverse them.
You end up connecting inverters to each other, and each panel only to its host inverter, like this:
If you have two lines of panels as I do, connect the far end of one line to the far end of the next line, so you end up with a long series of optimizers where both ends terminate with a loose wire on the end closest to your inverter.
Grounding is Important: Using the supplied grounding screw terminals, connect all the rails together with bare 10AWG copper wire. From that last terminal, you’ll be running a length of the same size wire down to the inverter.
4: Install the Solar Panels!

The bottom of each panel has two long output wires. Use clips and/or zip ties to keep the cables tidy so they don’t dangle onto the roof too much.
This step is better with two people, especially on a steep roof. Starting at the furthest corner from the location of your inverter, connect each the panel’s wires to the matching ones on its host inverter. Set the panels down straight, and use the click-in clamps that come with the racking system to clamp down the panel using your cordless drill/driver.
By the end of this step, you’ll have one or more tidy lines of panels with just two powerful-looking DC wires poking out the end, with connectors to go.
You’re now ready to build the final run of wire, which will enter a metal conduit and travel through your roof, down the side of your house, and into the inverter.
5: The Home Run:
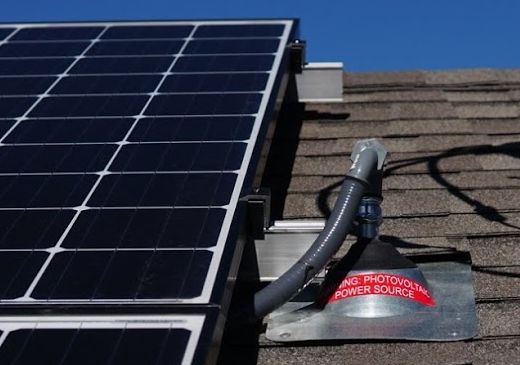
Drill a 1″ hole in your roof and put a roof boot over top of it, tucked under the upper course of shingles. From there, your goal is to provide a protected path to get the high voltage DC wires to from the panels, down to the inverter.
My city required 3/4″ metal rigid conduit, which gave me the opportunity to learn about the various fittings and connectors that are part of working with conduit. I also bought a conduit bending tool, since there are many more outdoor electrical projects still on the docket for the MMM HQ building.

I ran a length of metal conduit up from the inverter and just beyond the roof boot, then transitioned to a downward-facing connector to some flexible conduit, just to keep the wires covered until they get under the panels. All three conductors including the ground are running through this tube. If doing it again, I’d suggest using a different conduit box for that transition. Also, you can switch from a bare ground wire to a stranded, insulated ground at that point – much easier to pull through!
6: Mounting The Inverter and Connecting it all to the Grid:
The part that sounds the most mysterious is actually one of the most simple:
- Hang the inverter on the wall using the supplied bracket and a few screws
- Connect the conduit and pull in the DC wires from the solar panels into the inverter’s connection box. On this Solaredge unit, there are nice spring clip terminals.
- Do the same on the other side of the connection box, running a length of 10/3 household wiring (for outputs up to 40 amps) right into the breaker box, as if you were hooking up any other 240 volt circuit.

Inverter mounting, including the conduit going up through the roof (left), out to the main breaker box (right), required warning stickers (red), and how it’s hooked up inside (bottom)
7: Get it all Inspected and Power it Up!
The inspector will probably have a nitpick or two with your work. Stay strong and make any required corrections, and pass that inspection. Then you flip on the AC breaker, the DC power switch, the inverter’s main power switch, and poke through the menu systems to make sure everything is set to run the way you like it.
For this Solaredge system, I had to run a “Pairing” step with the power optimizers (see manual), and add a TP-Link Wireless Repeater/Bridge to allow the inverter’s wired Ethernet connection to join my existing property-wide Wi-Fi network. Which happens to be the the spectacularly good Google Mesh Wi-fi system.
So What’s Next?
From this point on, it’s all on automatic pilot. The system generates electricity every day, which reduces the Headquarters power bill down to zero. In winter, the days are shorter so we might consume more than we produce. But in summer, a large surplus will more than make up for it.

My inverter from Solaredge comes with a really nice monitoring features, available from both a phone app and any browser. Plus, you can share a public version of your page with anyone. Here’s one I made for the MMM-HQ array.
At the time of writing, I’ve had the system online for 27 mostly-January days, including a couple of writeoffs where the panels were covered in snow. It has still averaged about 10 kWh of electricity production per day, which is more than the average consumption of the whole facility. Put another way, the 265 kWh of electricity is enough to power an electric car for roughly 1000 miles of driving.
The monitoring tool also estimates about 410 lbs of CO2 emissions prevented, which is 0.2 tons or about $4.00 worth at current carbon cleanup rates. If you happen to care about running a carbon-neutral life (or business) as I do, this means the carbon offset makes your solar electricity about 15% more valuable in your mental accounting.
I can also double or triple the number of panels on this particular system (once I decide on a good place to put them) without changing the inverter or any of the grid-tie connections, which will greatly improve my annual return on investment. It’s just a LEGO-like plug and play to connect more panels to an existing rack of them, plus the inverter has a second set of inputs if you are running in some wires from a string of panels you have placed somewhere else.
My power company pays out a check for any overall surplus at the end of each year, purchasing the power at a wholesale rate. But many regions are more solar-friendly than this, giving you a full retail or even higher rate for solar-generated electricity as an incentive to go green.
The Final Word:
Solar energy is strangely fun to produce – most people report satisfaction far beyond just the monetary benefits. It gets you out there rooting for the Sun, and for your fellow humankind to follow suit and start harvesting it alongside you. So if you’ve been considering getting it done, the time is good.
Thanks again to John Shaw (shawsolar.com) for all the help with this project. If you have questions about the details or the industry in general, please put them in the comments and both John and I should be able to weigh in.
And if you happen to own a home or business around Durango, CO, contact Shaw Solar directly and tell ’em who sent you!
Rough Edges Alert: I’ve started by publishing this article in an unpolished form, so If you see incorrect details, please let me know and I’ll clean it up over time after publication.
Via Finance http://www.rssmix.com/


No comments:
Post a Comment